16.11.2025 – Linux/SOGo_with_OpenID_authentication.md

SOGo with OpenID authentication

Notes on configuring the following setup:

  • SOGo serving a webmail interface as well as CalDAV and CardDAV via Apache as a reverse proxy
  • SOGo authentication against OpenID, provided by Keycloak
  • SOGo authentication against Dovecot via xoauth2, and Postfix which uses Dovecot as an authentication backend
  • All services using an LDAP server as a single source of truth, provided by FreeIPA / 389 Directory Server

Preconditions:

  • Keycloak and FreeIPA are up and running, with Keycloak user federation configured to use FreeIPA via LDAP
  • Apache is up and running
  • SOGo 5.12+ is installed

SOGo configuration

Parameters relevant to OpenID authentication in /etc/sogo/sogo.conf

 1
 2
 3
 4
 5
 6
 7
 8
 9
10
11
12
13
14
15
16
17
18
19
20
21
22
23
24
25
26
27
28
29
30
31
32
33
34
35
36
37
38
39
40
41
42
43
44
45
46
47
48
49
50
51
52
53
54
55
56
57
58
59
60
61
62
63
{
  // Must match Apache configuration
  WOPort = 127.0.0.1:10000;

  // Set authentication to OpenID
  SOGoAuthenticationType = openid;

  // Disable to allow redirects to keycloak and back
  SOGoXSRFValidationEnabled = NO;

  // Set xoauth2 for SMTP, IMAP, and ManageSieve
  SOGoSMTPAuthenticationType = xoauth2;
  NGImap4AuthMechanism = xoauth2;

  // Use Dovecot IMAP with explicit TLS
  SOGoIMAPServer = "imaps://mail.example.net:993";

  // Use Dovecot ManageSieve with StartTLS
  SOGoSieveServer = "sieve://mail.example.net:4190/?tls=YES";

  // Use Postfix submission with StartTLS
  SOGoMailingMechanism = smtp;
  SOGoSMTPServer = "smtp://mail.example.net:587/?tls=YES";  

  OCSOpenIdURL = "mysql://sogo:foobar@localhost:3306/sogo/sogo_openid";

  // Create a new client in Keycloak with Client authentication and Standard flow enabled, then add credentials below
  SOGoOpenIdConfigUrl = "https://auth.example.net/realms/example/.well-known/openid-configuration";
  SOGoOpenIdClient = sogo;
  SOGoOpenIdClientSecret = foobar;
  SOGoOpenIdScope = "openid profile email";
  
  // This is the key within the OpenID scope that will later be used to look up the user in the LDAP directory
  SOGoOpenIdEmailParam = "preferred_username";

  SOGoOpenIdEnableRefreshToken = YES;
  SOGoOpenIdTokenCheckInterval = 30;
  SOGoOpenIdLogoutEnabled = YES;

  // This is a somewhat tricky part. SOGo seems unable to use OpenID alone; instead, an additional UserSource is used to look up the user and their metadata after successful authentication. In this case, the preferred_username value (which in our case is <firstname.lastname>) is used to find the respective user entry in the LDAP directory.
  SOGoUserSources = (
    {
      type = ldap;
      id = example;
      CNFieldName = cn;
      IDFieldName = uid;
      UIDFieldName = uid;
      IMAPLoginFieldName = uid; // username used for Dovecot/Postfix
      MailFieldNames = (mail);
      baseDN = "cn=users,cn=accounts,dc=ldap,dc=example,dc=net";
      filter = "(objectClass='inetorgperson') AND (memberOf='cn=mailusers,cn=groups,cn=accounts,dc=ldap,dc=example,dc=net')";
      bindDN = "uid=sogo,cn=sysaccounts,cn=etc,dc=ldap,dc=example,dc=net";
      bindPassword = foobar;
      bindFields = (uid);
      bindAsCurrentUser = NO;
      canAuthenticate = YES;
      hostname = "ldap://127.0.0.1:389";
      ...
    }
  );

  ...
}

Apache configuration

Apache configurations found on the internet often seem outdated or inaccurate. Here is a working example for the above setup: /etc/apache2/sites-available/10-sogo.conf

 1
 2
 3
 4
 5
 6
 7
 8
 9
10
11
12
13
14
15
16
17
18
19
20
21
22
23
24
25
26
27
28
29
30
31
32
33
34
35
36
37
38
39
40
41
<VirtualHost *:80>
        ServerName mail.example.net
        Redirect permanent / https://mail.example.net
</VirtualHost>

<VirtualHost *:443>
        ServerName mail.example.net
        DocumentRoot /usr/lib/GNUstep/SOGo/WebServerResources

        Alias /SOGo.woa/WebServerResources/ /usr/lib/GNUstep/SOGo/WebServerResources/

        <Directory "/usr/lib/GNUstep/SOGo/WebServerResources">
                AllowOverride None
                Options +FollowSymlinks
                Require all granted
        </Directory>

        RequestHeader set "x-webobjects-server-port" "443"
        RequestHeader set "x-webobjects-server-name" "mail.example.net"
        RequestHeader set "x-webobjects-server-url" "https://mail.example.net"

        RewriteEngine On
        RewriteRule ^/?$ https://mail.example.net/SOGo/ [R=301,L]
        RewriteRule ^/.well-known/caldav/?$ /SOGo/dav [R=301,L]
        RewriteRule ^/.well-known/carddav/?$ /SOGo/dav [R=301,L]

        ProxyPreserveHost On
        SetEnv proxy-nokeepalive 1

        ProxyPass /SOGo/ "http://127.0.0.1:29080/SOGo/" retry=0
        ProxyPassReverse /SOGo/ "http://127.0.0.1:29080/SOGo/"

        #ProxyPass /Microsoft-Server-ActiveSync http://127.0.0.1:29080/SOGo/Microsoft-Server-ActiveSync retry=0
        #ProxyPassReverse /Microsoft-Server-ActiveSync http://127.0.0.1:29080/SOGo/Microsoft-Server-ActiveSync

        Header always add Strict-Transport-Security "max-age=31536000; includeSubDomains; preload"

        SSLEngine On
        SSLCertificateFile /etc/letsencrypt/live/example.net/fullchain.pem
        SSLCertificateKeyFile /etc/letsencrypt/live/example.net/privkey.pem
</VirtualHost>

Dovecot/Postfix configuration

A well-tested configuration to enable xoauth2 authentication for Postfix and Dovecot (<= 2.3) can be found here.

There are a few optional modifications to the above example configuration:

  • oauthbearer is not needed as SOGo uses xoauth2
  • If plain authentication with an LDAP backend is used for other email clients, the userdb configuration might need to be changed from static to ldap, including the LDAP-specific configuration

Instead of the introspection endpoint that requires another client to be created in Keycloak, you can also use the following in dovecot-oauth2.conf.ext

1
2
tokeninfo_url = https://auth.example.net/realms/example/protocol/openid-connect/userinfo?ignore=
username_attribute = preferred_username
19.05.2025 – Linux/Build_recent_SOGo_on_debian_bookworm.md

Build Recent SOGo on Debian Bookworm

Debian Bookworm ships with SOGo 5.8.0. To use newly added features such as OpenID authentication in SOGo, a more recent version is required. Before building SOGo, SOPE must be built and installed first.

The following bash script builds SOPE 5.12.1. Execute it in an empty directory:

 1
 2
 3
 4
 5
 6
 7
 8
 9
10
11
12
13
14
15
16
17
18
19
20
21
22
23
24
25
26
#!/bin/bash

rm -fr *.deb
rm -fr build/

mkdir build/ && cd build/

git clone https://salsa.debian.org/debian/sope.git

cd sope/

git checkout tags/debian/5.8.0-1  # Last bookworm compatible version
cp -a debian ../

git checkout tags/debian/5.12.1-1  # Adjust to most recent or desired version
rm -r debian/
mv ../debian/ .

# Decrement version to ensure proper upgrade when switching to Trixie
DEBEMAIL=john.doe@example.net DEBFULLNAME="John Doe" dch -v "5.12.1-0.1" -D stable "Automated bookworm build"

debuild -uc -us -b

mv ../libsope1_*.deb ../../
mv ../libsope-dev_*.deb ../../
mv ../sope-bin_*.deb ../../

Install SOPE using: dpkg -i libsope1_*.deb libsope-dev_*.deb sope-bin_*.deb

The following bash script builds SOGo 5.12.1. Execute it in an empty directory:

 1
 2
 3
 4
 5
 6
 7
 8
 9
10
11
12
13
14
15
16
17
18
19
20
21
22
23
24
25
26
27
28
29
30
#!/bin/bash

rm -fr *.deb
rm -fr build/

mkdir build/ && cd build/

git clone https://salsa.debian.org/debian/sogo.git

cd sogo/

git checkout tags/debian/5.8.0-1  # Last bookworm compatible version
cp -a debian ../

git checkout tags/debian/5.12.1-1  # Adjust to most recent or desired version
rm -r debian/
mv ../debian/ .

sed -i 's/JWT.h/SOGoAdmin.h/g' debian/patches/0005-Remove-build-date.patch
sed -i 's/inverse.ca/sogo.nu/g' debian/patches/0005-Remove-build-date.patch
sed -i 's/COOKIE_USERKEY_LEN[[:space:]]\+2096/COOKIE_USERKEY_LEN    2560/' SoObjects/SOGo/SOGoWebAuthenticator.m

# Decrement version to ensure proper upgrade when switching to Trixie
DEBEMAIL=john.doe@example.net DEBFULLNAME="John Doe" dch -v "5.12.1-0.1" -D stable "Automated bookworm build"

debuild -uc -us -b

mv ../sogo_*.deb ../../
mv ../sogo-activesync_*.deb ../../
mv ../sogo-common_*.deb ../../

Finally, install SOGo using: dpkg -i sogo_*.deb sogo-common_*.deb

Optionally, install the ActiveSync module with: dpkg -i sogo-activesync_*.deb

01.09.2024 – Linux/Build_ROS_2_on_debian.md

Build ROS 2 on debian bookworm

This brief documentation outlines one of many ways to build, package, and deploy ROS 2 (Jazzy) on Debian Bookworm. As Debian Bookworm is only supported at a Tier 3 level [1], one must compile the desired set of ROS 2 packages from source. There are various approaches to achieve this. In this note, I focus on obtaining a clean, lightweight, and deployable set of core packages, resulting in a well-defined and immutable environment suitable for both production and development. For production, the aim is to have a lightweight (small in size) package for deployment. For development, the aim is to keep the overlay sourced on top of the immutable core packages as thin as possible to minimize variance across different machines and developers.

This involves the following steps:

  • Set up a VM, container, or chroot to build the ROS 2 core workspace (optional, but useful due to the myriad of dependencies needed)
  • Install essential ROS 2 build tooling from the official Debian repository
  • Use rosinstall_generator or a handcrafted list to fetch the sources of the desired ROS 2 packages
  • Resolve all build dependencies, both Debian and ROS 2 packages
  • Build and install the ROS 2 packages to a generic, user-independent directory
  • Create a package containing the install directory, i.e., the resulting immutable ROS 2 core workspace

Some simple tooling that may help define, build, package, and run ROS 2 distributions on Debian Bookworm based on the ideas described in this note can be found at github.com/markuspetermann/ros2-debian

Optional: Use systemd-nspawn to create a build environment

As ROS 2 requires numerous dependencies to build, it may be desirable to run the build process in a separate Debian environment. Here is a brief example of how to use systemd-nspawn to set up and use a container

1
2
3
4
# Setup the container
$ sudo debootstrap stable /var/lib/machines/bookworm-ros2 http://deb.debian.org/debian/
# Switch into the container
$ sudo systemd-nspawn -D /var/lib/machines/bookworm-ros2

Within the container, create a build user

1
2
3
4
$ apt install build-essential ca-certificates sudo
$ adduser builder
$ adduser builder sudo
$ su builder

Install essential ROS 2 tooling from Debian repositories

A few tools are needed or at least helpful to download the desired set of package sources, examine their build dependencies, and start the build process. This list mostly resembles the packages included in the ros-dev-tools package [2]. The aim is to keep this list as short as possible

1
$ sudo apt install cmake colcon git python3-colcon-argcomplete python3-colcon-bash python3-colcon-cd python3-colcon-cmake python3-colcon-core python3-colcon-defaults python3-colcon-devtools python3-colcon-library-path python3-colcon-metadata python3-colcon-notification python3-colcon-output python3-colcon-package-information python3-colcon-package-selection python3-colcon-parallel-executor python3-colcon-python-setup-py python3-colcon-recursive-crawl python3-colcon-ros python3-colcon-test-result python3-colcon-zsh python3-rosdep2 python3-rosinstall-generator python3-setuptools vcstool wget

Lastly, run

1
$ rosdep update

Clone package sources

Create a workspace folder and a src/ directory within it

1
$ mkdir -p ~/ros2_ws/src/ && cd ros2_ws/

Next, clone the desired source repositories to the src/ directory either by using rosinstall_generator and vcs

1
$ rosinstall_generator desktop_full navigation2 --deps --rosdistro jazzy | vcs import src/

or by manually cloning the packages git repository to the src/ folder

1
$ cd src/ && git clone ...

One may also combine the two methods, e.g., pull in ros_desktop_full and nav2 via rosinstall_generator and then clone custom packages alongside.

Examine further build dependencies

The collected packages will likely require additional build dependencies. There are two types of build dependencies that need different handling. To get a list of the required and unsatisfied dependencies, use

1
2
$ rosdep install --rosdistro jazzy --from-paths src --ignore-src -y --skip-keys \
  "fastcdr python3-vcstool rti-connext-dds-6.0.1 urdfdom_headers xtensor" --simulate

The -skip-keys are a combination of the recommendations from the ROS 2 build documentation [3] and additional keys for packages that are named differently and consequently not detected by rosdep, such as xtensor, which is provided by libxtensor-dev in Debian.

The above command returns a list of dependencies that rosdep would try to install. While this would work for packages that are available in the Debian repositories and are named correctly, it would fail for all ROS 2 packages that are only available as Debian packages on Tier 1 platforms. The ROS 2 packages can be easily identified by the ros2- prefix.

First, most dependencies that are available from the official Debian repository, e.g., curl, can simply be installed by copying the package names and using apt install. To reduce the number of installed packages, add the --no-install-recommends flag

1
$ sudo apt install --no-install-recommends <list of packages>

For some packages such as xtensor, this will fail as Debian does not provide a package named xtensor. In these cases, use apt search to find the package that provides the required build dependencies—in this example, it is libxtensor-dev—and install it in the same way. It may be useful to add packages that cannot be resolved automatically to -skip-keys. rosdep provides a list of dependency name to Debian name mappings in /usr/share/python3-rosdep2/debian.yaml; however, it appears to be out of date.

Second, if there are any packages prefixed with ros2-, manually search for and clone the source of the respective ROS 2 packages as described above. This should only occur when adding packages manually, as rosinstall_generator, when called with the --deps flag, handles dependencies on other ROS 2 packages.

Build and install the ROS 2 packages

Create a generic, user-independent installation directory

1
2
3
$ sudo mkdir -p /opt/ros2
# Temporarily grant write permissions to the build user
$ sudo chown builder:builder /opt/ros2

Start the build process from within the workspace directory

1
2
$ cd ~/ros2_ws/
$ colcon build --install-base /opt/ros2 --merge-install --cmake-args -DCMAKE_CXX_FLAGS="-Wno-error=null-dereference -Wno-error=restrict"

Use --merge-install to reduce the length of the resulting PATH and similar environment variables when sourcing the final installation. The CMAKE_CXX_FLAGS convert some errors to warnings; otherwise, the build for the navigation2 package will fail.

Create a deployable package of the built core workspace

A simple method for creating a manually deployable package of the resulting workspace is to create a tar archive

1
2
$ sudo chown -R root:root /opt/ros2
$ tar czf ros2.tar.gz -C /opt/ ros2/

Using the core workspace

While some ROS 2 packages work when the installation folder is relocated after build, others such as Gazebo do not. Therefore, ensure that you always extract the archive to the same location where it was initially built, e.g., /opt/ros2.

Then, source the core workspace

1
$ . /opt/ros2/setup.bash

For development, create and source an overlay workspace to develop additional ROS 2 packages as described in the official documentation.

When using the core workspace in an environment other than the build environment, some runtime dependencies will most certainly be missing. This usually results in ROS nodes and applications being unable to start. In most cases, the error messages clearly indicate which packages are missing. Here is a list of necessary runtime dependencies I have collected over time; however, this may vary significantly among different setups

 1
 2
 3
 4
 5
 6
 7
 8
 9
10
11
# Runtime dependencies for ROS 2 core packages
$ sudo apt install --no-install-recommends liblttng-ust1 libspdlog1.10

# Runtime dependencies for demo_nodes_cpp
$ sudo apt install --no-install-recommends libconsole-bridge1.0

# Runtime dependencies for RViz2
$ sudo apt install --no-install-recommends libzzip-0-13 liblttng-ust1 libspdlog1.10 liborocos-kdl1.5 python3-lark

# Runtime dependencies for Gazebo Harmonic 
$ sudo apt install --no-install-recommends libtinyxml2-9 liburdfdom-model3.0 libassimp5 qml-module-qtquick-controls qml-module-qtquick-controls2 qml-module-qtquick-dialogs libgdal32 libbullet3.24 libode8 libfcl0.7 libgflags2.2

[1] https://www.ros.org/reps/rep-2000.html
[2] https://www.ros.org/reps/rep-2001.html
[3] https://docs.ros.org/en/jazzy/Installation/Alternatives/Ubuntu-Development-Setup.html

This article is licensed under CC BY-NC-SA 4.0

24.07.2024 – Linux/Fix_nvidia_sleep_script_prevents_lockscreen.md

Fix nvidia sleep script prevents lockscreen

On a debian bookworm where both, nvidia drivers and a lockscreen application that prevents changing virtual terminals (VT) when in locked state - such as sxlock - are installed, the system fails to enter suspend state with a locked screen. Instead, the screen is locked, and only after unlocking it, the system goes into suspend mode and once resuming, the system is in an unlocked state.

The reason for this is the /usr/bin/nvidia-sleep.sh that is installed by the nvidia-suspend-common package and invoked by the nvidia-suspend.service. The dependecies for entering suspend state are

1
2
3
4
5
6
$ systemctl list-dependencies systemd-suspend.service
systemd-suspend.service
○ ├─nvidia-suspend.service
● ├─system.slice
○ └─sleep.target
○   └─lock@example.service

The /usr/bin/nvidia-sleep.sh is invoked after the screen was locked. However the script contains a snippet that stores the currently active virtual terminal and then switches to VT 63 when invoked before going to suspend and vice versa when invoked after resuming. The call to chvt is the part that causes the script to wait for the screen to get unlocked so switching of VTs becomes possible again.

To fix this comment out the chvt calls in /usr/bin/nvidia-sleep.sh.

23.07.2024 – Linux/Fix_OpenProject_Invalid_host-name.md

Fix OpenProject “Invalid host_name”

Starting with OpenProject 14.3, hostname checking has become more strict (see config/environments/production.rb:182 ff.). When running OpenProject behind an Apache reverse proxy, requests may arrive with different source hostnames. By default, the OPENPROJECT_HOST__NAME environment variable is only set to the public hostname served by Apache. To resolve this issue, add:

1
ProxyPreserveHost on

to your Apache VirtualHost configuration and reload the service:

1
$ sudo systemctl reload apache2.service

Alternatively, you can work around this issue by adding:

1
export OPENPROJECT_ADDITIONAL__HOST__NAMES=["127.0.0.1:6000"]

to /etc/openproject/conf.d/other and then run:

1
$ sudo openproject configure

to apply the changes. After this, restart OpenProject.

17.03.2022 – Linux/Alacritty_only_partitially_shows _colors.md

Alacritty only partially shows colors in SSH session

Set COLORTERM=truecolor. For example by adding the following to .bashrc

1
2
3
4
5
if [[ -v SSH_CONNECTION ]]; then
        if [[ "$TERM" == "alacritty" ]]; then
                export COLORTERM=truecolor
        fi
fi

Alternatively by passing down the variable with ssh -o SendEnv=COLORTERM, this needs to be explicitly allowed by the server though.

26.10.2021 – Linux/Fix_unknown_terminal_error.md

Fix unknown terminal error

If the terminal behaves oddly, e.g. backspace or colors not working, a common cause is a missing terminfo database, especially on very minimalistic installations. If /usr/share/terminfo is empty install ncurses-term.

20.10.2021 – Linux/btrfs/Create_redundant_and_encrypted_storage.md

Create encrypted and redundant storage with btrfs and LUKS

Use btrfs for redundancy on the filesystem level and LUKS for encryption. The raid1 mode of btrfs differs from classical raid 1 as btrfs stores 2 copies of each block on 2 different devices, not a copy of each block on each device. Btrfs may also be configured to store 3 or 4 copies of each block with modes raid1c3 and raid1c4. Disks don’t have to be equal in size, however, with 2 copies of each block no disk can provide more than 50% of the total capacity.

One can either encrypt the entire disk or create and encrypt a partition. The former is less complex, the later let’s us more easily identify the disk as not empty.

If desired, create a partition with type 0x83 on each disk that should be used for the pool.

Setup encrypted disk/partition, partitions /dev/sd[a-c]1 used in this example

1
2
3
$ sudo cryptsetup luksFormat --type luks2 /dev/sda1
$ sudo cryptsetup luksFormat --type luks2 /dev/sdb1
$ sudo cryptsetup luksFormat --type luks2 /dev/sdc1

Add second keys for automatic decryption during boot. Assumption: The storage to be created will not be the boot device and the boot device itself is also encrypted.

1
2
3
4
5
6
7
8
9
$ sudo mkdir -p /etc/secrets && sudo chmod 700 /etc/secrets

$ sudo dd if=/dev/urandom of=/etc/secrets/pool0-key bs=4k count=1
$ sudo dd if=/dev/urandom of=/etc/secrets/pool1-key bs=4k count=1
$ sudo dd if=/dev/urandom of=/etc/secrets/pool2-key bs=4k count=1

$ sudo cryptsetup luksAddKey /dev/sda1 /etc/secrets/pool0-key
$ sudo cryptsetup luksAddKey /dev/sdb1 /etc/secrets/pool1-key
$ sudo cryptsetup luksAddKey /dev/sdc1 /etc/secrets/pool2-key

Get disk/partition UUIDs

1
2
3
$ sudo blkid /dev/sda1
$ sudo blkid /dev/sdb1
$ sudo blkid /dev/sdc1

Edit /etc/crypttab to decrypt disks/partitions during boot

1
2
3
4
...
pool0_crypt UUID=5a9200f3-d967-47d5-b897-4471d4969d1f /etc/secrets/pool0-key luks
pool1_crypt UUID=022ad8d6-06ff-4eac-b2a7-3502f8f48daa /etc/secrets/pool1-key luks
pool2_crypt UUID=af64274e-69b1-4870-8ee7-8a21f0e2ee11 /etc/secrets/pool2-key luks

Mount encrypted disks/partitions manually or reboot

1
2
3
$ sudo cryptsetup luksOpen -d /etc/secrets/pool0-key /dev/sda1 pool0_crypt
$ sudo cryptsetup luksOpen -d /etc/secrets/pool1-key /dev/sdb1 pool1_crypt
$ sudo cryptsetup luksOpen -d /etc/secrets/pool2-key /dev/sdc1 pool2_crypt

Create btrfs filesystem, use 2 copies for both data (-d) and metadata (-m)

1
$ sudo mkfs.btrfs --csum blake2 -m raid1 -d raid1 /dev/mapper/pool0_crypt /dev/mapper/pool1_crypt /dev/mapper/pool2_crypt

Edit /etc/fstab to mount storage during boot, doesn’t matter which pool device is used

1
2
...
/dev/mapper/pool0_crypt     /mnt/pool   btrfs   defaults    0       2
03.09.2021 – Linux/tftp_with_nftables.md

tftp with nftables

To use tftp behind nftables with any kind of drop all rule specified add the following to /etc/nftables.conf

1
2
3
4
5
6
7
ct helper tftp {
    type "tftp" protocol udp
}

chain input {
    udp dport 69 ct helper set "tftp"
}

And (kernel < 6.0.0) enable conntrack helpers with

1
$ echo 1 | sudo tee /proc/sys/net/netfilter/nf_conntrack_helper

tftp-hpa uses fcntl() to lock files. This might cause issues when serving files on a NFS mount. In case this happens mounting the NFS with the nolock option might be a solution.

16.04.2021 – Linux/Send_email_when_disk_reaches_certain_usage.md

Send email when disk reaches certain usage

Frequently run the following script via cron

 1
 2
 3
 4
 5
 6
 7
 8
 9
10
11
12
#!/bin/bash

MAX=90
EMAIL=admin@example.com
PART=sda1

USE=`df -h | grep $PART | awk '{ print $5 }' | cut -d'%' -f1`
HOST=`hostname`

if [ $USE -gt $MAX ]; then
  echo "Percent used: $USE" | mail -s "Host $HOST running out of disk space" $EMAIL
fi
04.04.2020 – Linux/Run_Windows_in_KVM_with_dedicated_GPU.md

Run Windows in KVM with dedicated GPU

This is also known as GPU or PCIe passthrough. All notes based and tested on Debian Buster.

Activate IOMMU in /etc/default/grub. On intel platforms replace amd_iommu with intel_iommu.

1
2
3
...
GRUB_CMDLINE_LINUX_DEFAULT="... amd_iommu=on ..."
...

and apply changes with

1
$ sudo update-grub && sudo reboot

Some tutorials suggest to blacklist the graphics driver, e.g. nouveau, however if the host GPU uses the same driver this is not a viable option. Instead, use the vfio driver for the VM GPU. Run

1
$ lspci -vnn

to identify the Vendor ID and Device ID of the devices for the VM. Some graphics cards use two or even more devices, usually one VGA controller, one Audio device and sometimes USB devices. Create and edit /etc/modprobe.d/vfio.conf and add the VID:DID pairs, e.g.

1
options vfio-pci ids=10de:1f82,10de:10fa

If for any reason another driver claims the device before vfio-pci is able to, check if the module is compiled into the kernel or not, e.g. if xhci_hcd is claiming the device instead check

1
$ grep -r CONFIG_USB_XHCI_HCD /boot/config-*

If the module is compiled in CONFIG_USB_XHCI_HCD=y then search for a unbind/rebind solution or recompile your kernel. If not CONFIG_USB_XHCI_HCD=m then add

1
softdep xhci_hcd pre: vfio-pci

to /etc/modprobe.d/vfio.conf

Add the following modules to /etc/initramfs-tools/modules

1
2
3
4
5
6
...
vfio
vfio_iommu_type1
vfio_pci
vfio_virqfd
...

and apply changes with

1
$ sudo update-initramfs -u -k all && sudo reboot

Create and run iommu_info.sh (Source: https://wiki.archlinux.org/index.php/PCI_passthrough_via_OVMF)

1
2
3
4
5
6
7
8
#!/bin/bash
shopt -s nullglob
for g in /sys/kernel/iommu_groups/*; do
        echo "IOMMU Group ${g##*/}:"
        for d in $g/devices/*; do
                echo -e "\t$(lspci -nns ${d##*/})"
        done;
done;

Check if the desired devices are listed in a separate IOMMU group, on most consumer grade hardware this will not be the case. If yes, skip the ACS override patch section. If no, kernel needs to be compiled with ACS override patch from https://queuecumber.gitlab.io/linux-acs-override/

See https://kernel-team.pages.debian.net/kernel-handbook/ch-common-tasks.html for some hints on how to quickly patch build a kernel on Debian.

Once the kernel with ACS override patch is installed edit /etc/default/grub

1
2
3
...
GRUB_CMDLINE_LINUX_DEFAULT="... pcie_acs_override=downstream ..."
...

and apply changes with

1
$ sudo update-grub && sudo reboot

Then add PCIe devices to Windows VM, run it and install drivers for graphics card. Nvidia drivers will refuse to start inside a VM throwing error 43 (see https://mathiashueber.com/fighting-error-43-nvidia-gpu-virtual-machine/).

Therefore it might be necessary to edit the VM config to hide KVM from guest

1
$ virsh edit <name_of_vm>
 1
 2
 3
 4
 5
 6
 7
 8
 9
10
11
12
13
<features>
  <hyperv>
    ...
    <vendor_id state='on' value='1234567890ab'/>
  </hyperv>
  ...
  <kvm>
    <hidden state='on'/>
  </kvm>
  ...
  <ioapic driver='kvm'/>
  ...
</features>

Now the GPU driver should start as expected.

28.01.2020 – Linux/Setup_unpriviledged_bridged_network_in_qemu.md

Setup unpriviledged bridged network in qemu

Ensure bridge-utils are installed

1
$ sudo apt-get install bridge-utils

Edit /etc/network/interfaces, set default ethernet interface to manual and add bridge instead

1
2
3
4
5
6
7
8
9
auto eth0
iface eth0 inet manual

auto br0
iface br0 inet dhcp
  bridge_ports eth0
  bridge_stp off
  bridge_maxwait 0
  bridge_fd 0

Create /etc/qemu/bridge.conf, and set SUID bit of qemu-bridge-helper (so this setup is not fully unpriviledged)

1
2
3
$ sudo mkdir -p /etc/qemu
$ echo 'allow br0' | sudo tee -a /etc/qemu/bridge.conf
$ sudo chmod u+s /usr/lib/qemu/qemu-bridge-helper

Now br0 can be used in qemu:///session without root priviledges.

16.01.2020 – Linux/Add_swapfile.md

Add swapfile

Adjust the desired size in the dd call. Sometimes it’s suggested that fallocate is used to allocate space for the swapfile, however only by writing the entire file with dd the space is really allocated. Otherwise, you might end up with a swapon: /var/tmp/swapfile: swapon failed: Invalid argument error message.

1
2
3
4
$ sudo dd if=/dev/zero of=/var/tmp/swapfile count=1024 bs=4M
$ sudo chmod 600 /var/tmp/swapfile
$ sudo mkswap /var/tmp/swapfile
$ sudo swapon /var/tmp/swapfile

Also add the following line to /etc/fstab

1
/var/tmp/swapfile	swap	swap	defaults	0	0
01.12.2019 – Linux/Let_unprivileged_binary_open_ports_below_1024.md

Let unprivileged binary open ports < 1024

Linux usually only permits binaries running as root to listen on ports below 1024. To change this for a certain binary, e.g. node

1
$ sudo setcap CAP_NET_BIND_SERVICE=+eip /usr/bin/node
19.10.2019 – Linux/Android/Using_dd_to_dump_Android_partionions_via_adb.md

Using dd to dump Android partitions via adb

Unfortunately there are some pitfalls, e.g. \n is converted to \n\r which is rather annoying in binary data.

Works as expected

1
$ adb exec-out 'dd if=/dev/block/mmcblk0p1 2>/dev/null' > mmcblk0p1.bin

Also works as expected, but once resulted in a dump missing 2 bytes (could not be reproduced)

1
$ adb shell 'dd if=/dev/block/mmcblk0p1 2>/dev/null' | sed 's/\r$//' > mmcblk0p1.img

This results in the said conversion (DON’T USE THIS)

1
$ adb shell 'dd if=/dev/block/mmcblk0p1 2>/dev/null' > test.img

Broken images can be fixed with

1
$ sed 's/\r$//' < test.img > test.bin

or

1
$ cat test.img | sed 's/\r$//' > test.bin

This also doesn’t work as expected

1
$ adb shell 'stty raw && dd if=/dev/block/mmcblk0p1 2>/dev/null' > mmcblk0p1.img

Restoring a partition is straightforward though

1
$ adb push mmcblk0p1.bin /dev/block/mmcblk0p1

Also helpful https://android.stackexchange.com/questions/69434/is-it-possible-to-cat-a-file-to-an-android-phone-and-dd-to-dev-xxx-on-the-fly-w

02.10.2019 – Linux/ZFS/ZFS_Rollback.md

ZFS Rollback

List existing snapshots for given dataset

1
$ zfs list -t snapshot | grep tank/home/user

Recursively rollback dataset

1
$ zfs rollback -r tank/home/user@snapshotname
02.09.2019 – Linux/Ruby/Install_gem_locally.md

Install gem locally

To install a gem in your home directory use the --user-install option. E.g.

1
$ gem install --user-install bundler

Add ~/.gem/ruby/x.y.z/bin to your $PATH if needed.

18.07.2019 – Linux/ZFS/Mount_zvol.md

Mount zvol

Trivial if /dev/zdXpY exists

1
$ sudo mount /dev/zdxpY /mnt/tmp

If only /dev/zdX exists use

1
$ fdisk -l /dev/zdX

to find out the start sector of the respective partition and use the offset option to mount the partition

1
$ sudo mount -o offset=1048576 /dev/zdX /mnt/tmp
18.07.2019 – Linux/Proxmox/Free_memory_on_running_machines.md

Proxmox: Free memory on running machines

If you are getting a Cannot allocate memory error when trying to start a VM, you can free memory on running machines by executing

1
$ sudo echo 3 > /proc/sys/vm/drop_caches

on the guests.

28.01.2018 – Linux/Limit_of_shadow_copies_over_SMB.md

Limit of shadow copies over SMB

The integration of shadow copies into the Windows Explorer significantly eases the recovery of mistakenly deleted or overwritten files, especially since this feature is also available for shared storages over SMB with a potentially large number of users. The vfs_shadow_copy2 [1] module adds the ability to Samba to expose snapshots to Windows clients and comprises an elegant way to expose ZFS snapshots directly to a Windows user. Great! you might think, as ZFS has no problem with a large number of snapshots [2], this seemingly gives us the power to establish long term and fine grained filesystem level versioning of our data.

Over the past years I have installed half a dozen FreeNAS based network storage systems, utilizing ZFS with periodic snapshots and Samba with vfs_shadow_copy2 enabled to expose snapshots to Windows clients. This has worked out perfectly at the beginning, but Microsoft wouldn’t be Microsoft if there wasn’t a surprise, and over time this once noble feature began to vanish. At first sight, there was no sign of any obvious error and quickly testing the very same FreeNAS version in a virtual machine instantly brought back the shadow copies, so it couldn’t be a sole matter of the FreeNAS server or the Windows client. After playing around with different configurations for a while it turned out that it constantly worked in my test setup, as it did in any new setup in the past, but no matter what I tried, I couldn’t revive shadow copies on the established servers.

As google didn’t bring up anything similar to this issue I started digging into this. First, increasing the log verbosity of Samba showed the following:

1
../source3/smbd/smb2_server.c:1782(smbd_smb2_request_verify_creditcharge) CreditCharge too low, given 1, needed 2

The SMB protocol uses credits to rate limit traffic and prevent a denial-of-service. This is accomplished by granting and consuming credits to/from the clients [3]. Each client request consumes at least one credit and the server grants at least one credit with every response to the client [4]. The number of credits needed for a read request depends on the size of the response and is calculated as follows ( 1 + (Length – 1) / 65536 ) [5], whereas multi-credit or LargeMTU requests are possible since SMB 2.1 [6]. At this point, I started to get an idea about what was going on here. To get the last pieces together I started dumping the TCP packets involved in the request using Wireshark.

Traffic Capture

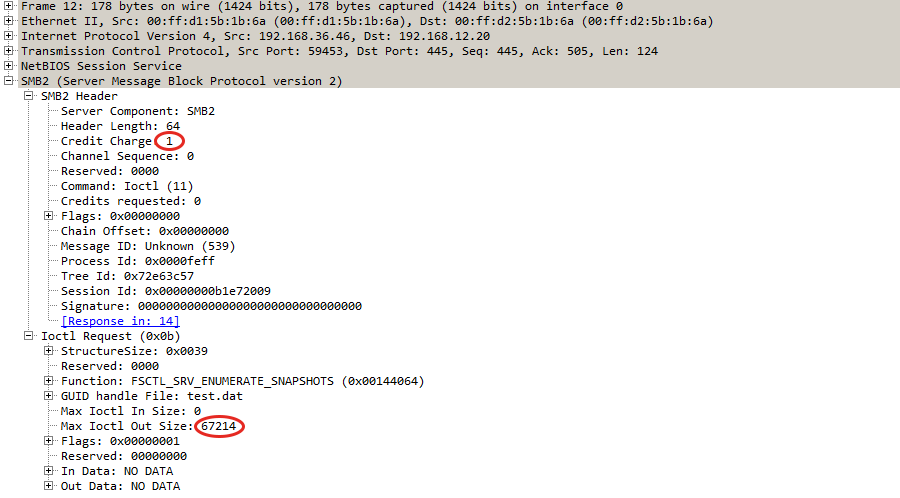
Packets 9 and 11 show the first half of the communication, the client asking for snapshots, offering a 16 byte response buffer, which the server uses to let the client know the total number of available snapshots and the response size needed to transfer a complete list of snapshots [7].

SMB response

The client then correctly requests the list of snapshots, announcing the requested data space Max IOCTL Out Size, but only offering one credit. Since the expected data size is greater than 65536, one credit is not sufficient for this operation and the server correctly therefore responds with STATUS_INVALID_PARAMETER [7]. This explains the log entry observed earlier.

SMB Error

Even if you disable the DisableLargeMTU Setting [8] the client still doesn’t offer more than one credit for a FSCTL_SRV_ENUMERATE_SNAPSHOTS operation and I couldn’t find any other option so far to teach Windows to receive a snapshot lists larger than one packet. This leads in fact to an effective limit of roughly 1300 snapshots, the number that fits into a single packet.

[1] https://www.samba.org/samba/samba/docs/man/manpages/vfs_shadow_copy2.8.html
[2] https://en.wikipedia.org/wiki/ZFS
[3] https://msdn.microsoft.com/en-us/library/cc246719.aspx
[4] https://msdn.microsoft.com/en-us/library/cc246704.aspx
[5] https://msdn.microsoft.com/en-us/library/cc246638.aspx
[6] https://blogs.msdn.microsoft.com/openspecification/2009/06/22/smb-2-1-multi-credit-large-mtu-operations/
[7] https://msdn.microsoft.com/en-us/library/cc246447.aspx
[8] https://msdn.microsoft.com/en-us/library/windows/hardware/dn567661(v=vs.85).aspx

This article is licensed under CC BY-NC-SA 4.0

27.06.2015 – Linux/courier/Setting_up_Mailman_with_the_Courier_MTA.md

Setting up Mailman with the Courier MTA

Most recently I went through the troublesome procedure of setting up Mailman 2.15 on a Server running Debian Wheezy and the Courier Mail Server MTA. While everything needed could be easily installed from the official Wheezy Repo, it did by far not work out-of-the-box. Getting the Mailman GUI served via an Apache Server was a five minute task but when it came to the email processing it clearly seems that Mailman is more optimized to work with the more widely used Postfix MTA than with my favorite, the Courier Mail Server. Nevertheless some research and a few moments of debugging will get you a working setup. I would like to briefly sum up my experiences as I couldn’t find a single working tutorial for this, but lots of bits and pieces.

Let’s begin with something easy and do the Apache configuration first. This is pretty straight forward as there is a well-documented sample configuration file in /etc/mailman/apache.conf that I mostly used. I ended up with this

 1
 2
 3
 4
 5
 6
 7
 8
 9
10
11
12
13
14
15
16
17
18
19
20
21
22
23
24
25
26
27
28
29
30
31
32
33
34
35
36
37
38
39
40
41
42
43
44
45
46
47
<VirtualHost *:80>
        ServerName lists.domain1.tld
        ServerAlias lists.domain2.tld
        DocumentRoot /var/www

        <Directory "/usr/lib/cgi-bin/mailman/">
                AllowOverride None
                Options ExecCGI
                AddHandler cgi-script .cgi
                Order Allow,Deny
                Allow from all
        </Directory>

        <Directory "/var/lib/mailman/archives/public/">
                Options FollowSymlinks
                AllowOverride None
                Order Allow,Deny
                Allow from all
                DirectoryIndex index.html
        </Directory>

        <Directory "/usr/share/images/mailman/">
                AllowOverride None
                Order Allow,Deny
                Allow from all
        </Directory>

        <Directory "/var/lib/mailman/archives/">
                Options FollowSymLinks
                AllowOverride None
        </Directory>

        Alias /pipermail/ /var/lib/mailman/archives/public/
        Alias /images/mailman/ /usr/share/images/mailman/
        ScriptAlias /admin /usr/lib/cgi-bin/mailman/admin
        ScriptAlias /admindb /usr/lib/cgi-bin/mailman/admindb
        ScriptAlias /confirm /usr/lib/cgi-bin/mailman/confirm
        ScriptAlias /create /usr/lib/cgi-bin/mailman/create
        ScriptAlias /edithtml /usr/lib/cgi-bin/mailman/edithtml
        ScriptAlias /listinfo /usr/lib/cgi-bin/mailman/listinfo
        ScriptAlias /options /usr/lib/cgi-bin/mailman/options
        ScriptAlias /private /usr/lib/cgi-bin/mailman/private
        ScriptAlias /rmlist /usr/lib/cgi-bin/mailman/rmlist
        ScriptAlias /roster /usr/lib/cgi-bin/mailman/roster
        ScriptAlias /subscribe /usr/lib/cgi-bin/mailman/subscribe
        ScriptAlias /mailman/ /usr/lib/cgi-bin/mailman/
</VirtualHost>

Note that you have to set the DocumentIndex Option to add index.html for the public archive directory, just in case you also unset this on the global level.

The configuration of Mailman itself is also not too challenging. There is just the one /etc/mailman/mm_cfg.py configuration file. There you need to set the DEFAULT_EMAIL_HOST=’lists.domain1.tld‘ and DEFAULT_URL_HOST=’lists.domain1.tld‘ to some working hosts before actually setting up the first mailing list. If you already set up the required ‚mailman‘ site list and you are having trouble with the default localhost.localdomain setting, then you can still easily fix this with [1]

1
withlist -l -a -r fix_url

Additionally I adjusted the DEFAULT_URL_PATTERN=’http://%s/mailman/‘ option to remove the cgi-bin part from the url, actually this is not important, it just has to be consistent with the Apache configuration. After this you can add the site list with

1
newlist mailman

and start the mailman daemon. You may just ignore the stuff about the aliases after creating the list or you may even go ahead and uncomment the MTA=None line in the mm_cfg.py to suppress this output, but I have not tested this. Now we should have Mailman running and Apache serving a working GUI.

In the next step we need to find a good solution to handle the incoming emails that need to be forwarded to the Mailman Server. While this theoretically can be done via aliases, this is quite troublesome and aliases have to be updated whenever a new list is created. There is a short note from 2003 on how this can be accomplished [2], however this failed due to a recent bug in the makealiases script [3]. The second solution that I came across involves forwarding all emails that Courier cannot deliver to any local mailbox or alias to a Python script courier-to-mailman.py [4] which is also around for more than a decade and recently has finally made it into the Mailman source [5], where you may download it (the script is found in the /contrib folder). I followed the pattern of the postfix-to-mailman.py script, copied the file to /etc/mailman/courier-to-mailman.py and linked it to be available from /usr/lib/mailman/bin/courier-to-mailman.py. While this is just a modified version of the postfix-to-mailman.py, it needed some tweaking in order to work properly. First of all, as I didn’t use the configure script from the source, you may have to manually insert the proper paths in the courier-to-mailman.py. For Wheezy, replace @prefix@ by /usr/lib/mailman and @VAR_PREFIX@ by /var/lib/mailman. Also, the hardcoded sendmail path didn’t work, but I am not quite sure if this is a general problem in Wheezy or just on my specific setup, where I had to adjust the path to /usr/sbin/sendmail. Last, ensure that the script is executable, which means including something like

1
#!/usr/bin/env python

If this is not already included (this depends on which version you downloaded) and setting permissions accordingly.

Now we have to configure the Courier MTA, to forward all the emails intended to be processed by Mailman to the script. Here I found the comments in the script somewhat misleading. First, the (Sub-)Domains receiving the emails have to be added to /etc/courier/esmtpacceptmailfor.dir/esmtpacceptmailfor and /etc/courier/hosteddomains. Don’t forget to run makeacceptmailfor and makehosteddomains and ensure that the configuration gets properly reloaded at this point. Then we simply create /etc/courier/aliasdir/.courier-default with the following content

1
|/usr/bin/preline /usr/lib/mailman/bin/courier-to-mailman.py

This forwards all incoming emails that cannot be delivered to any local mailbox or alias to the respective script. This method however comes with the disadvantage, that from now we accept all incoming emails with a „250 OK“ message and since we want to avoid producing backscatter spam we are not able to bounce undeliverable emails at a later point (depending on your use-case this might however be legally required). Theoretically we could also create a .courier-listname-default file with the very same content to reduce the amount of garbage emails we forward to the script and have them dropped earlier, but this file only processes emails for the pattern listname-xyz@lists.domain.tld. For Domains listed in hosteddomains it is not possible to have a /etc/courier/aliasdir/.courier-listname file which takes care of the emails addressed to listname@lists.domain.tld. For this to work we would have to list the respective Domain in /etc/courier/locals instead of hosteddomains, which would imply that all emails addressed to any-system-account@lists.domain.tld would be delivered to the corresponding system account [6]. This would again most likely increase the amount of garbage emails especially addressed to root@… or other well-known accounts. The further procedure however is the same for both methods. Ensure that the /etc/courier/aliasdir/ directory is owned by daemon or the respective user that is running courier, otherwise you will later get an „511 maildrop: Home directory owned by wrong user“ error [7]. The last thing we have to teach Courier in order to let Mailman send emails is to allow relaying via the local IPv6 address (::1). This also turned out to be somewhat tricky as there is a uncommon notation used in /etc/courier/smtpaccess/default [8] and there are mostly wrong solutions for this posted. This might has changed in current releases but in Courier 0.68.2 that comes with Wheezy the only solution that works is exactly adding the line

1
:0000:0000:0000:0000:0000:0000:0000:0001<TAB>allow,RELAYCLIENT

to smtpaccess/default – replace with an actual TAB, don’t use any additional spaces, multiple TABs etc. and don’t forget to run makesmtpaccess afterwards. Alternatively you may run Mailman using authenticated SMTP to send emails [9], but I have not tested this.

Go ahead and play around a little bit sending emails to mailman@lists.domain.tld, adding some externally hosted email addresses to this list and make sure everything is working. It is not? Well, then you might have stumbled upon one of those two problems:

Getting an „IOError: [Errno 13] Permission denied“ error in /var/log/mailman/error, stating an permission error in somewhere in the /var/lib/mailman/archives directory? Then make sure the entire archive directory is owned by the user list.

Playing around with aliases and getting an „456 Address temporarily unavailable“ error in your courier log, even after changing the config and restarting courier-mta? Then check the mailq, make sure to cancel all pending undeliverable messages with cancelmsg and the clean the /var/lib/courier/track directory. There, Courier keeps track of undeliverable addresses for a certain amount of time or until the message could be delivered and blocks any further incoming message to this address. This is especially annoying if you play around with different configurations.

Last, I implemented a host filter into courier-to-mailman.py, in the hope to decrease the wasted computing power on incoming garbage emails. The accepted Domains are hardcoded, but can be easily adjusted (see comments in the script). This is the final courier-to-mailman.py script that I came up with.

Finally there is to note positively that the update to Mailman 2.1.18 from the wheezy-backports went smooth as an usual Debian update does and negatively that Mailman uses a global namespace, which makes it impossible to provide two separate lists with the same name under two different domains running a single instance [10]. Although I don’t want to take care about this until the first naming conflict arises, I already stumbled upon a possible solution [11].

[1] https://www.progclub.org/blog/2012/02/01/mailman-fix_url-py/
[2] https://mail.python.org/pipermail/mailman-users/2003-March/027187.html
[3] https://bugs.debian.org/cgi-bin/bugreport.cgi?bug=703570
[4] https://mail.python.org/pipermail/mailman-developers/2006-November/019274.html
[5] https://ftp.gnu.org/gnu/mailman/
[6] http://www.courier-mta.org/dot-courier.html
[7] http://ehc.ac/p/courier/mailman/message/18549088/
[8] http://www.courier-mta.org/couriertcpd.ht
[9] https://mail.python.org/pipermail/mailman-users/2005-October/047086.html
[10] http://wiki.list.org/DOC/4.47%20Virtual%20domain%20hosting%20with%20Mailman%3F
[11] https://code.launchpad.net/~msapiro/mailman/vhost

This article is licensed under CC BY-NC-SA 4.0
26.08.2014 – Linux/courier/Unwrapping_the_Courier_Filter_Process.md

Unwrapping the Courier Filter Process

The Courier Mail Server comes along with some quite powerful filter and post-processing mechanisms. It turned out that the rather complex structure requires detailed knowledge about the possibilities of each step to figure out where to apply certain filtering or post-processing tasks for incoming emails. The overview I gained over the mechanisms during my approaches to solve the following tasks – First to filter incoming emails according to common DNS blacklists for certain accounts as well as alias addresses that are just forwarded, and Secound to automatically encrypt every incoming email for certain accounts – should be roughly summarized in this post.

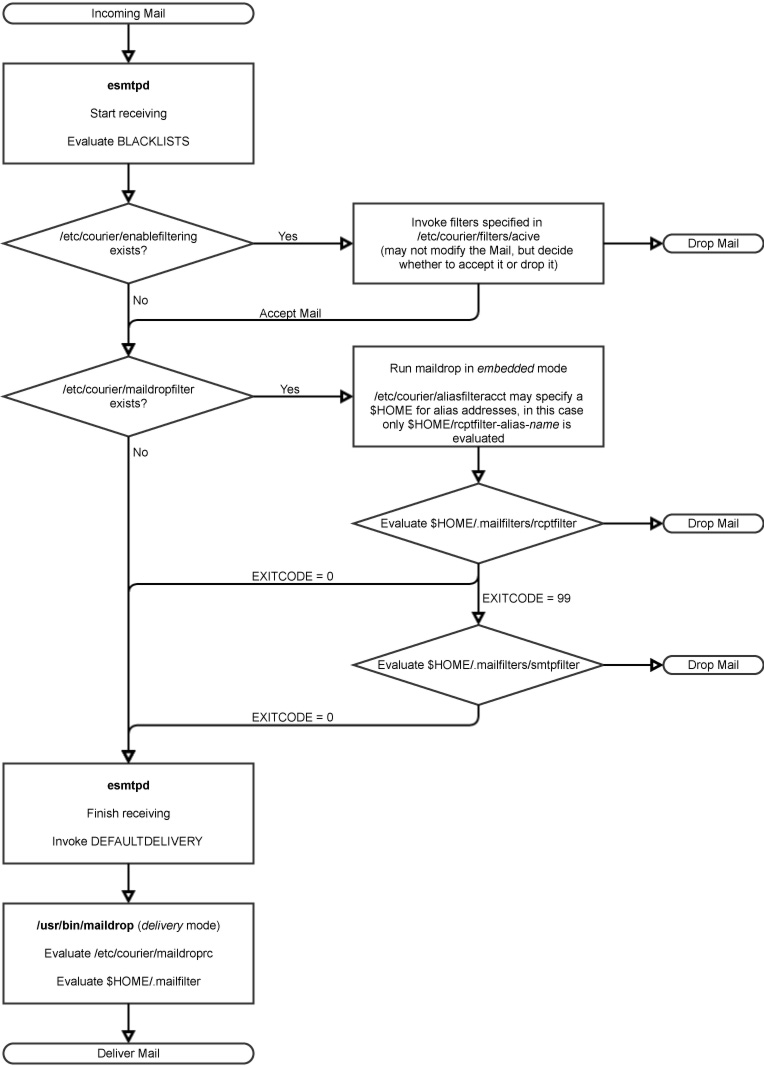
Courier Filter Process

The filter process can be divided into the filtering during receiving the email – at this point the filter’s main task is to decide whether to accept the email or drop the connection right away – and the post-processing of the email after fully receiving it. For the latter, the possibilities are basically endless, as this step may be carried out by any local Mail Delivery Agent (MDA), which is specified in the DEFAULTDELIVERY variable in /etc/courier/courier. In this case maildrop is used as the MDA.

In the first step the BLACKLISTS are queried and the results are reported by setting the specified environment variables. In the default example:

1
BLACKLISTS='-block=zen.spamhaus.org,BLOCK2 -block=cbl.abuseat.org,BLOCK2'

Spamhaus is queried and the BLOCK2 environment variable is set if the senders IP is listed. If the BLOCK environment variable is specified instead, esmtps immediatly drops the connection and refuses to receive the email. If this behaviour is too strict and one would additionally like to log the mails dropped, one may set any other unused environment varible, in most examples BLOCK2 is used.

The courierfilter supplies an API to external applications that may be enabled in /etc/courier/enablefiltering for specified receive channels, and soft-linked via the filterctl command to /etc/courier/filter/active/. As I have never used this mechanism as it is said to be highly buggy, I would recommend the official documentaion [1].

In the following esmtpd checks whether /etc/courier/maildropfilter exists. This file should contain the path to the maildrop binary that is included in the courier distribution, in this case it is /usr/bin/maildrop. If this file exists maildrop is executed in the embedded mode. In this mode the functionality of maildrop is somewhat limitted and some commands, such as xfilter, are not available. See [2] for a full list. However there is a workaround for this limitation, as it is possible to include any mailfilter script that resides within /etc/courier/maildroprcs/ for which the limitations are suspended [2]. In this step the file $HOME/.mailfilters/ rcptfilter is evaluated first, right after receiving the header of the email. If this filter returns with EXITCODE = 0 the email is accepted and the transfer of the DATA section is continued. If the EXITCODE = 99 the transfer of the DATA section is also continued but before it is acknowledged $HOME/.mailfilters/smtpfilter is evaluated and the email is only accepted if it returns EXITCODE = 0. In any other case the connection is dropped. At this point the BLOCK2 environment variable may be queried using the import statement. For alias addresses specified in /etc/courier/aliases/ that are just forwarded to a local account or an external address, there is usually no proper $HOME specified. In this case /etc/courier/aliasfilteracct may specify a $HOME for alias addresses. The $HOME given in /etc/courier/aliasfilteracct must be a valid $HOME of an existing user (no virtual user), otherwise courier will fail to evaluate any rcptfilter and exit with „400 stat() failed on aliasfilteracct“. For aliases only the rcptfilter can be used and files have to be named $HOME/.mailfilters/rcptfilter-alias-name, where name is the full alias address [3]. For local aliases which don’t name a domain /etc/courier/me is appended. Be aware that each period ‚.‘ in name must be replaced by a colon ‚:‘ e.g. rcptfilter-alias-sample@markuspetermann:net. One may also create an rcptfilter-default file which is used if no other file matches the alias. There are quite a few more features, especially regarding sub-addresses that won’t be covered at this point.

After the email has been fully received esmtpd invokes the Mail Delivery Agent, which is specified via the DEFAULTDELIVERY variable in /etc/courier/courierd. The default value points to ./Maildir which just places the email in the Maildir within the users $HOME. If one wishes to implement further post-processing of received emails, one may use maildrop in delivery mode to perform such tasks. This gives us rather endless possibilities to process and modify the incoming email. If maildrop is specified as local MDA it will first evaluate /etc/courier/maildroprc which contains the part of the maildrop script that applies globally to every incoming email. In addition to this one may place a $HOME/.mailfilter which contains any further part of the script that only applies to the emails of the specific user. At this point the BLOCK2 and other environment variables are not available anymore, as this is a completely different instance of maildrop running. Here, one may for example use the xfilter command to encrypt every incoming email (that is unencrypted) with the PGP key of the user, before delivering it.

[1] https://www.courier-mta.org/courierfilter.html
[2] https://www.courier-mta.org/maildrop.html
[3] https://www.courier-mta.org/localmailfilter.html

This article is licensed under CC BY-NC-SA 4.0